
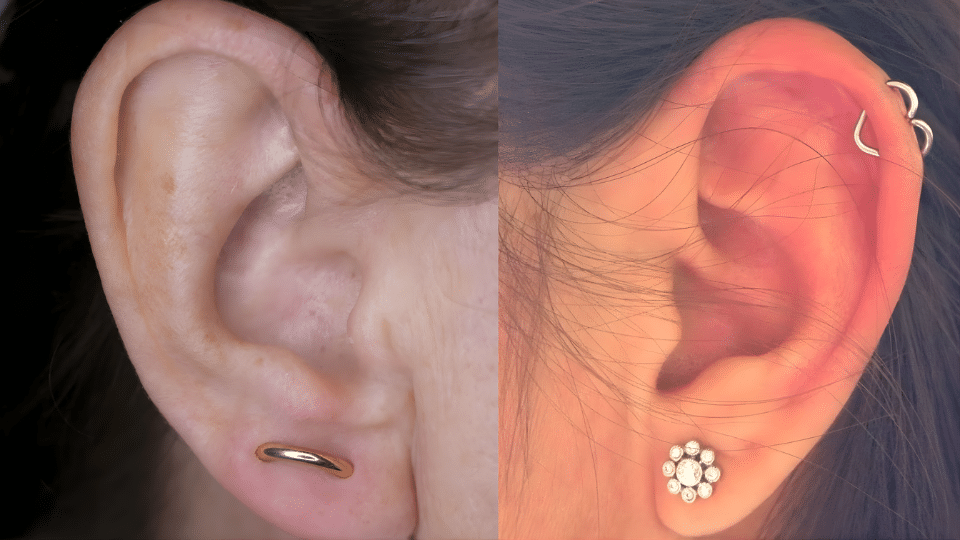
Ear piercings have become more than just a fashion statement; they’re a way to express yourself.
Each piercing tells its own story. Each type of piercing is painful, but that pain eventually heals, leaving many scars, even the scar that nobody saw except you.
Just like after-breakdown haircuts, the piercing is a new source of a move-on statement for Gen Zs.
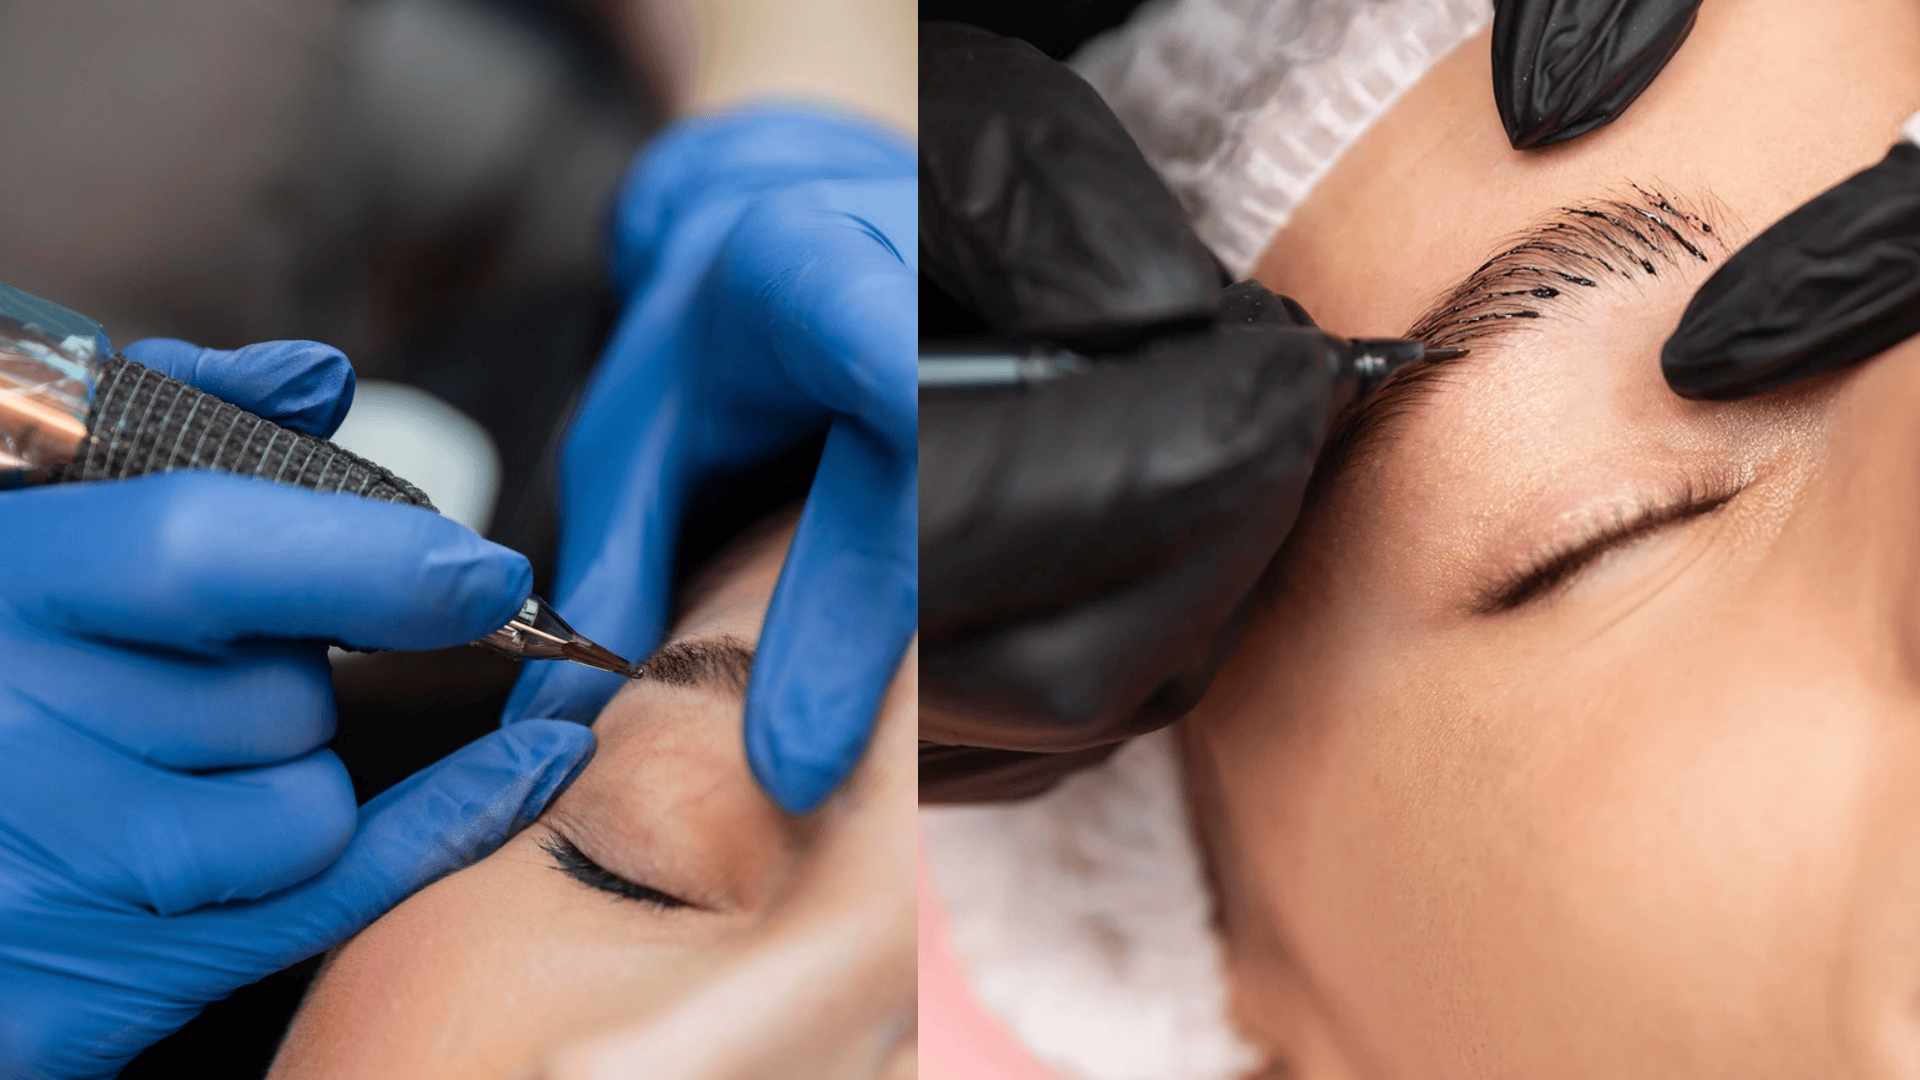
But before you book your appointment, this blog will help you know what you’re getting into.
Different spots on your ear come with different pain levels, healing times, and styling options.
Some heal in weeks, while others need months of care.
The right choice depends on your comfort level, lifestyle, and the look you want to create.
Let’s find the perfect type of ear piercing for you.
What are the Different Types of Ear Piercings?
Before choosing your next piercing, it helps to know how each one feels, how long it takes to heal, and the kind of style it creates.
1. Lobe Piercing
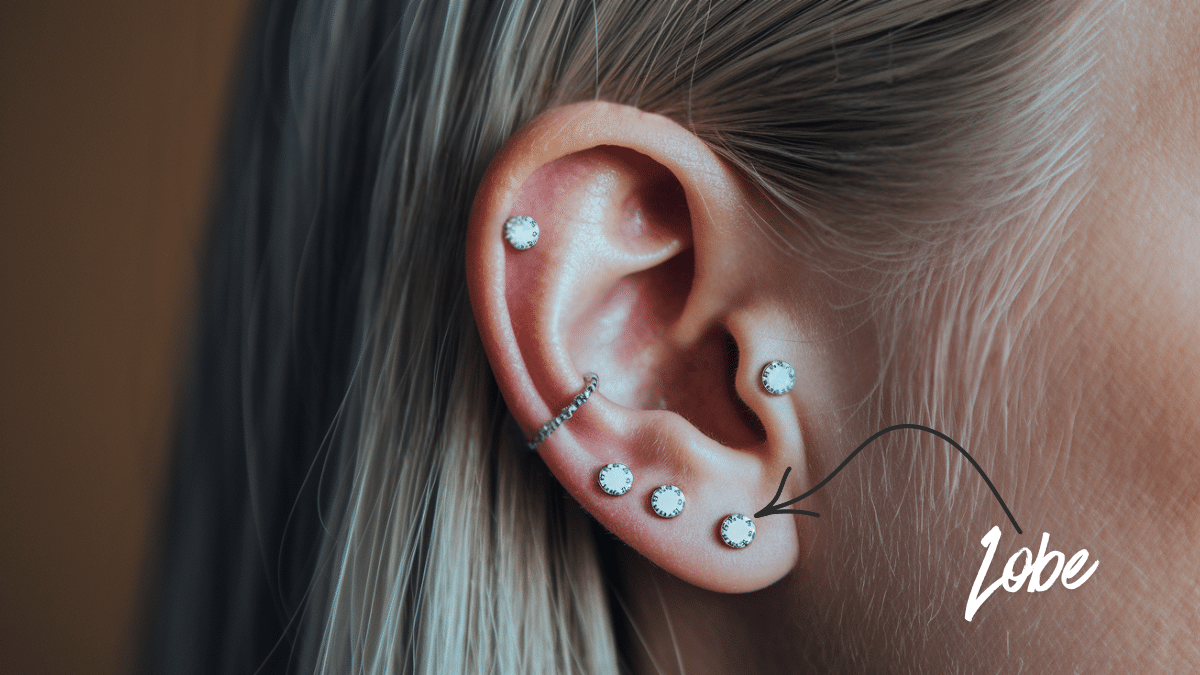
Pain Level: ■ □ □ □ □
Healing Time: 6 to 8 weeks
Best Jewellery: Simple studs at first, small hoops later
Gen Z Style: Mismatched studs or cute mini hoops
The lobe is the softest part of your ear, making it the easiest place to start. Most people feel just a quick pinch that fades within seconds. The area stays calm if you keep the jewellery light.
After recovery, this spot becomes your foundation for any ear styling. You can wear hoops, stones, tiny charms, or even two different earrings on each side. Gen Z loves mixing metals and shapes here.
2. Upper Lobe Piercing
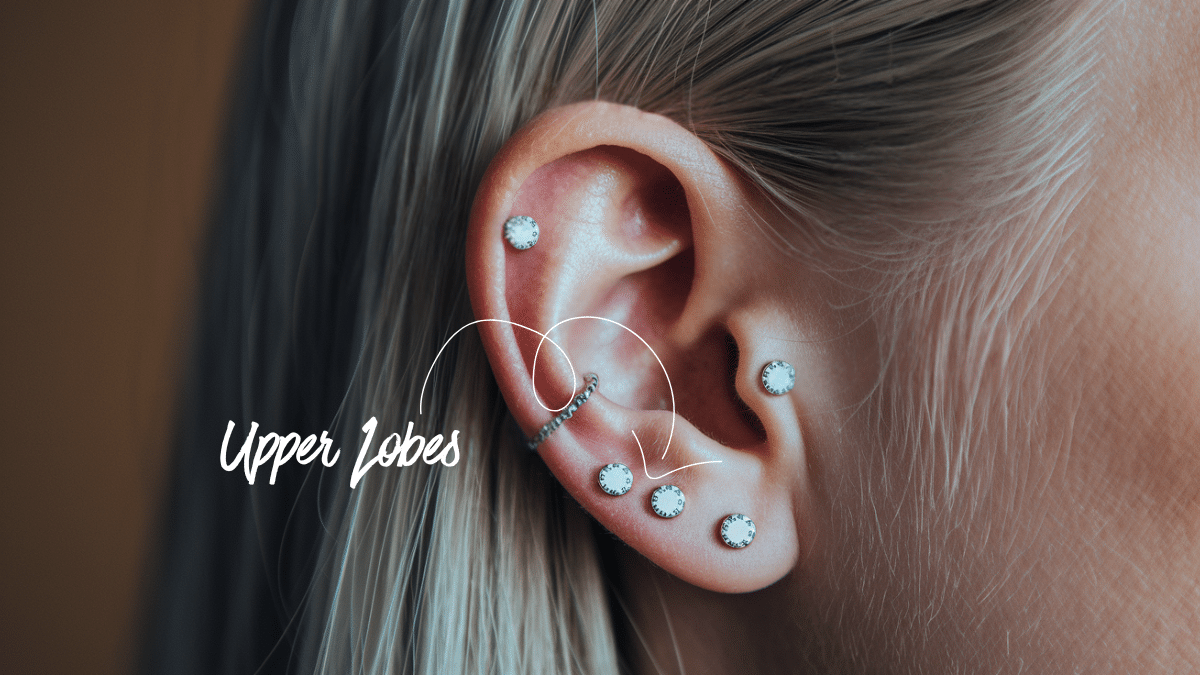
Pain Level: ■ □ □ □ □
Healing Time: 6 to 10 weeks
Best Jewellery: Flat-back studs first, then small huggies
Gen Z Style: Soft stacks and matching pairs
This piercing sits just above your standard lobe, adding height without entering cartilage. The area might feel sore if you sleep on that side too early.
Once healed, tiny huggies sit close to the skin. Many people build a “mini stack” here with matching stones or two identical studs in a row.
3. Stacked Lobe Piercing
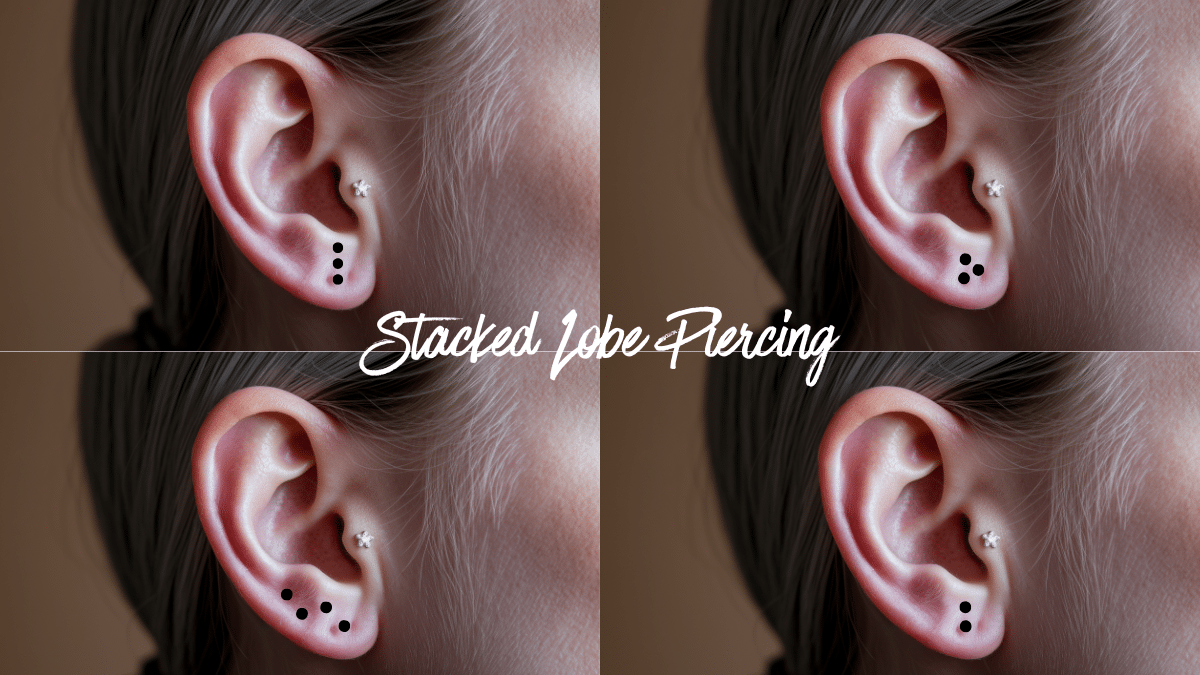
Pain Level: ■ □ □ □ □
Healing Time: 6 to 10 weeks
Best Jewellery: Studs for healing, thin hoops later
Gen Z Style: Coordinated micro studs with a playful twist
Multiple piercings lined up create a neat, structured look. You need gentle care since the piercings sit close together.
After healing, mix small studs and hoops to create a tidy lineup. A clean set of tiny studs with one small standout piece breaks the pattern nicely.
4. Helix Piercing
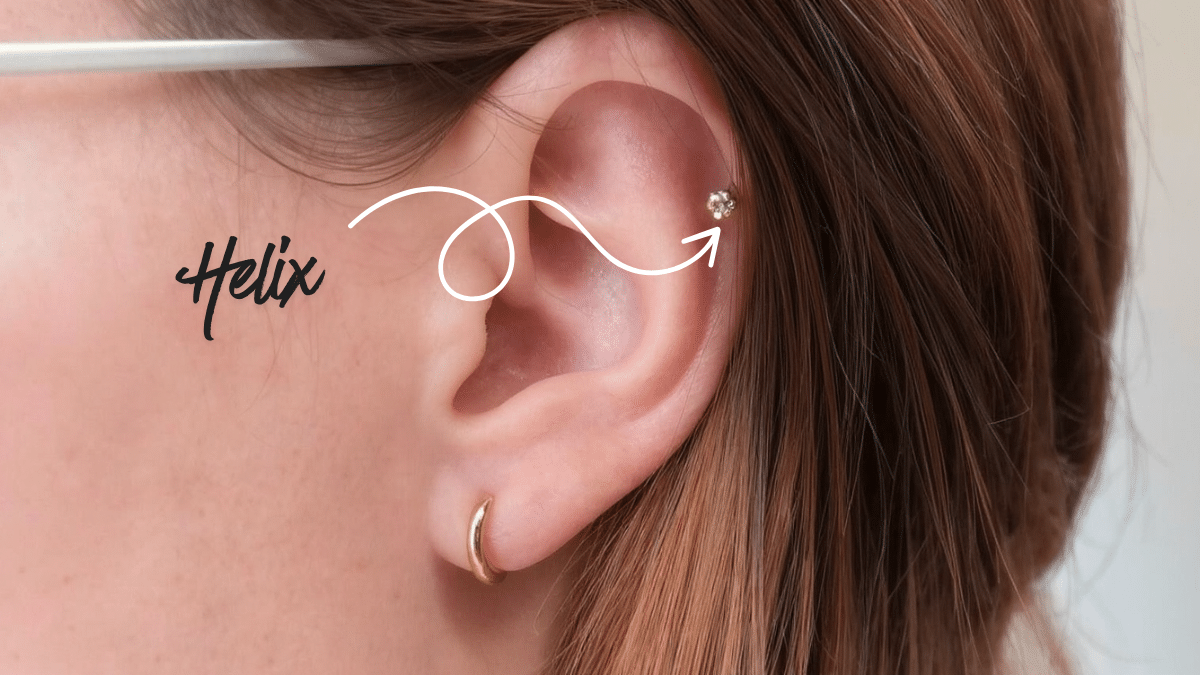
Pain Level: ■ ■ □ □ □
Healing Time: 3 to 6 months
Best Jewellery: Small hoops, flat-back studs
Gen Z Style: Thin hoops or tiny stones
Helix piercings sit along the outer cartilage. Healing takes time because cartilage gets less blood flow. Avoid pressure from headphones while recovering.
Once healed, slim hoops look amazing here. Gen Z often wears one thin hoop for a clean, stylish look.
5. Double Helix Piercing
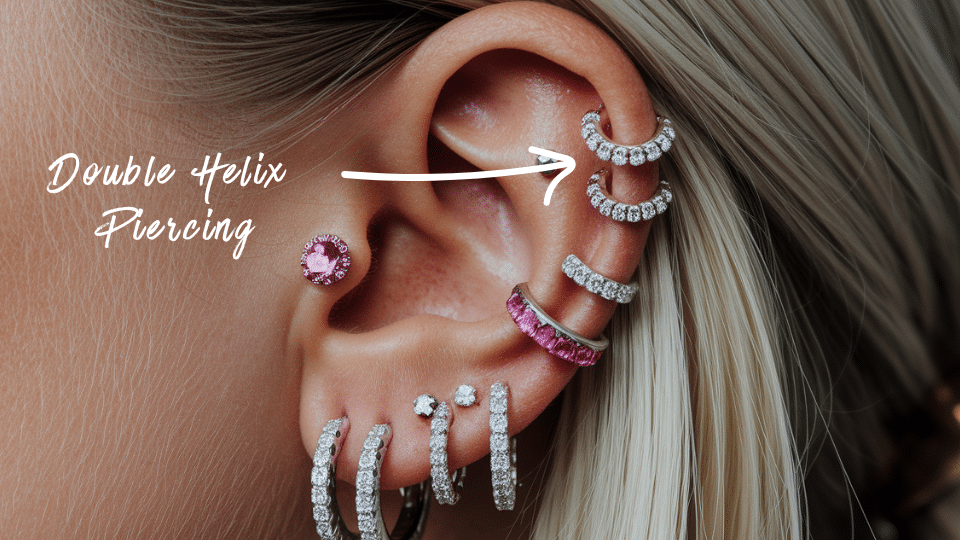
Pain Level: ■ ■ □ □ □
Healing Time: 4 to 6 months
Best Jewellery: Matching studs
Gen Z Style: Two identical stones or metal studs
A double helix gives a symmetrical look. Healing takes patience since there are two piercings in the same area. Keep hair away during the early days.
Matching pieces on both holes creates a clean finish.
6. Forward Helix Piercing
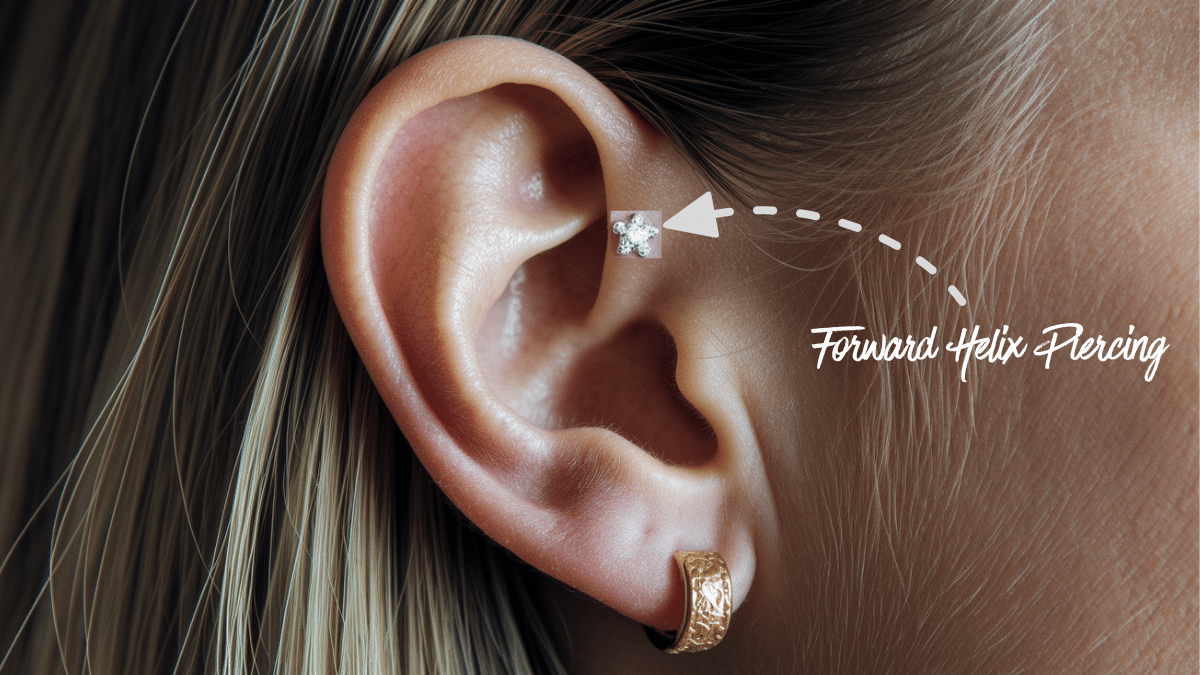
Pain Level: ■ ■ ■ □ □
Healing Time: 3 to 6 months
Best Jewellery: Small studs
Gen Z Style: Mini studs with a soft shine
Forward helix piercings sit near the front of the ear. They are cute but sensitive during healing since the placement is close to your face and hairline.
Once healed, tiny studs look clean and flattering. Bright stones or small metallic dots work well here.
7. Flat Piercing
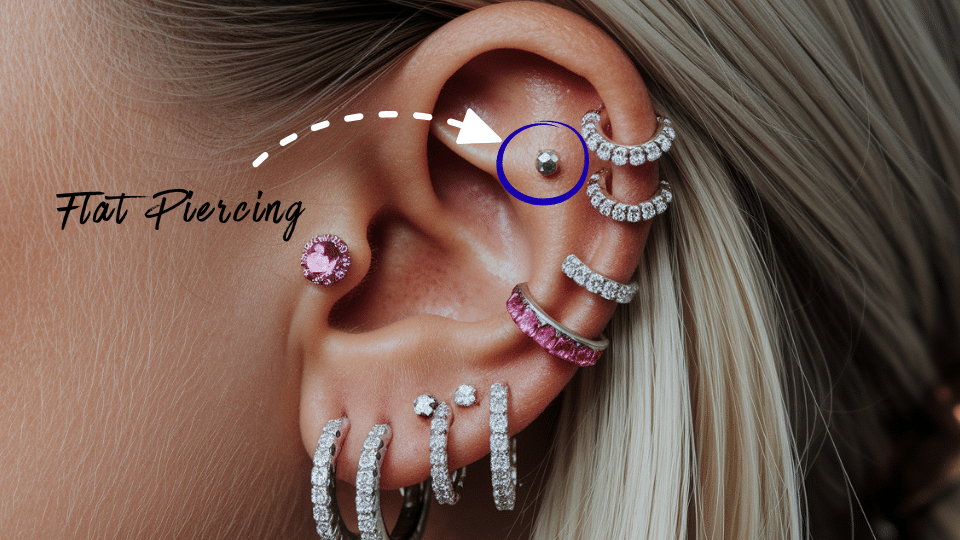
Pain Level: ■ ■ ■ □ □
Healing Time: 4 to 9 months
Best Jewellery: Flat-back decorative studs
Gen Z Style: Shiny clusters or star-shaped studs
A flat piercing sits on the broad surface of the upper ear. Healing can be slow because the area is wide and firm. Sleeping on it too soon causes irritation, so alternating sides helps.
Decorative studs or tiny clusters that sit flat are common choices.
8. Conch Piercing
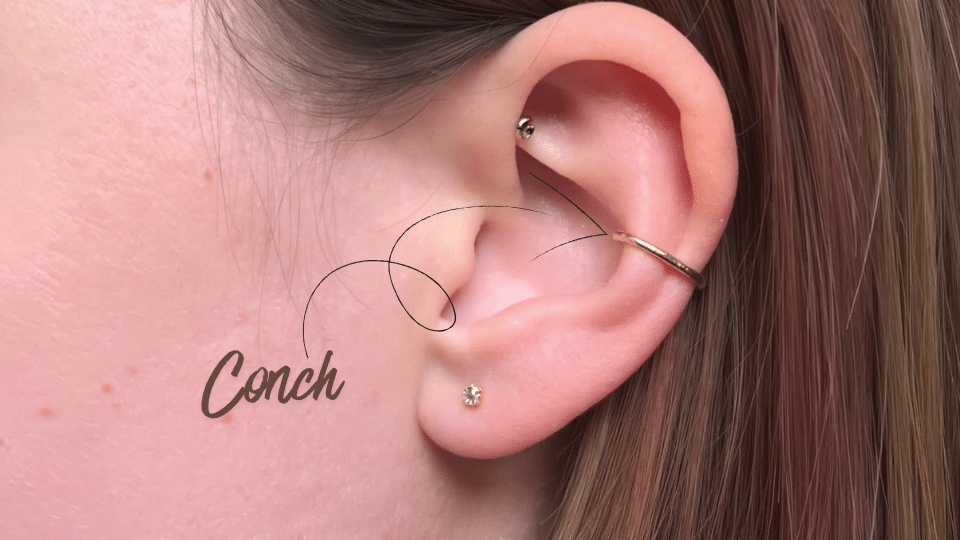
Pain Level: ■ ■ ■ □ □
Healing Time: 6 to 9 months
Best Jewellery: Studs for healing, hoops later
Gen Z Style: Large hoops hugging the ear
Conch piercings feel bold and stylish. Healing takes some time because the cartilage here is thick. A stud works best at first since it stays stable.
Later, you can switch to a hoop that circles the ear, giving it a strong center point.
9. Inner Conch
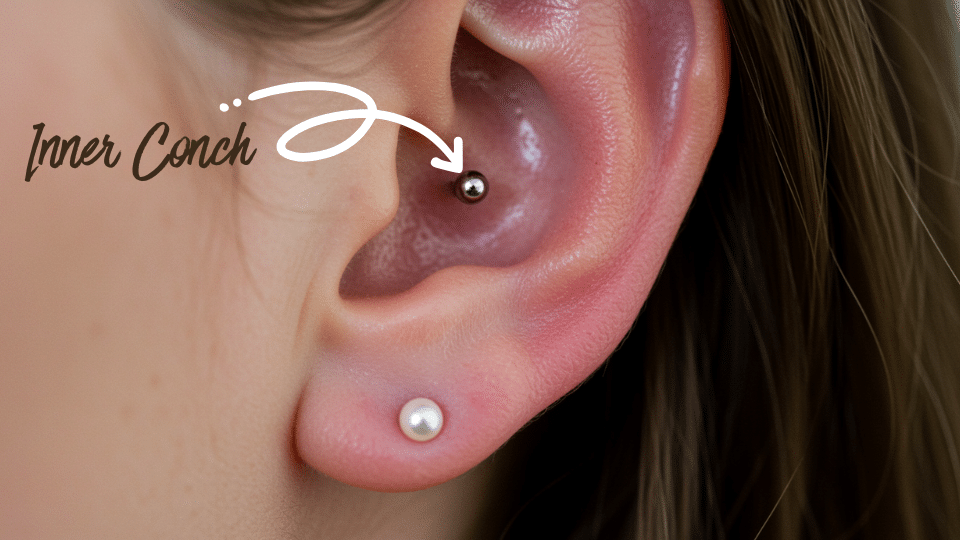
Pain Level: ■ ■ ■ □ □
Healing Time: 6 to 9 months
Best Jewellery: Studs for healing, snug hoops later
Gen Z Style: Statement hoops that sit close to the inner curve
The inner conch sits in the deep bowl-shaped area of your ear, right next to the ear canal, but slightly higher than the standard conch.
Because the cartilage here is thick, the sensation feels firm but manageable. It heals best with a stud at the start since it keeps movement minimal.
Once fully healed, a hoop that wraps around the inner curve gives a bold, centered look. Gen Z often uses this piercing to anchor their entire ear styling, pairing it with subtle lobe pieces or matching cartilage studs.
10. Tragus Piercing
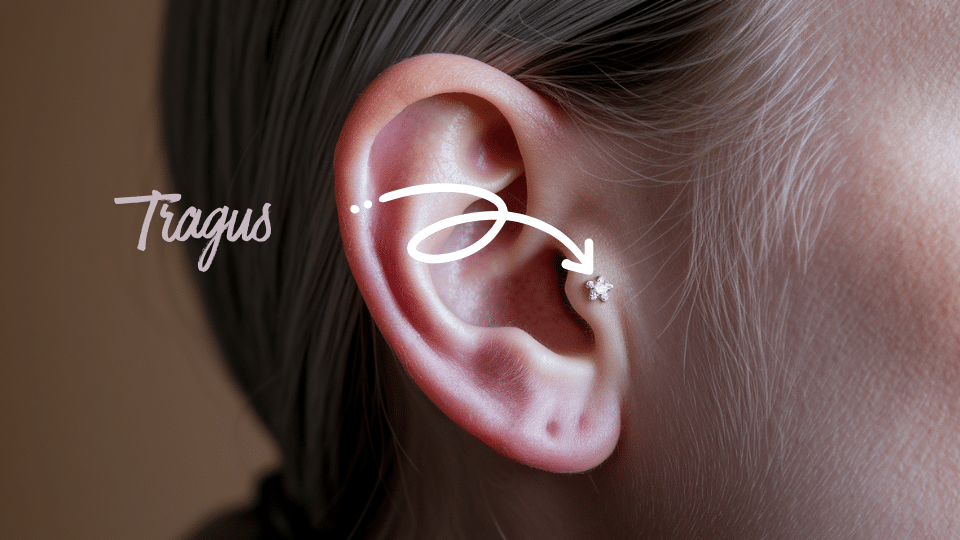
Pain Level: ■ ■ ■ □ □
Healing Time: 3 to 6 months
Best Jewellery: Small studs
Gen Z Style: Tiny metallic dots
The tragus sits near the ear canal. Healing is steady, but you need to be gentle with the earphones. A small stud works best in the early stage.
A tiny sparkling stud brings a soft highlight to this spot.
11. Anti-Tragus Piercing
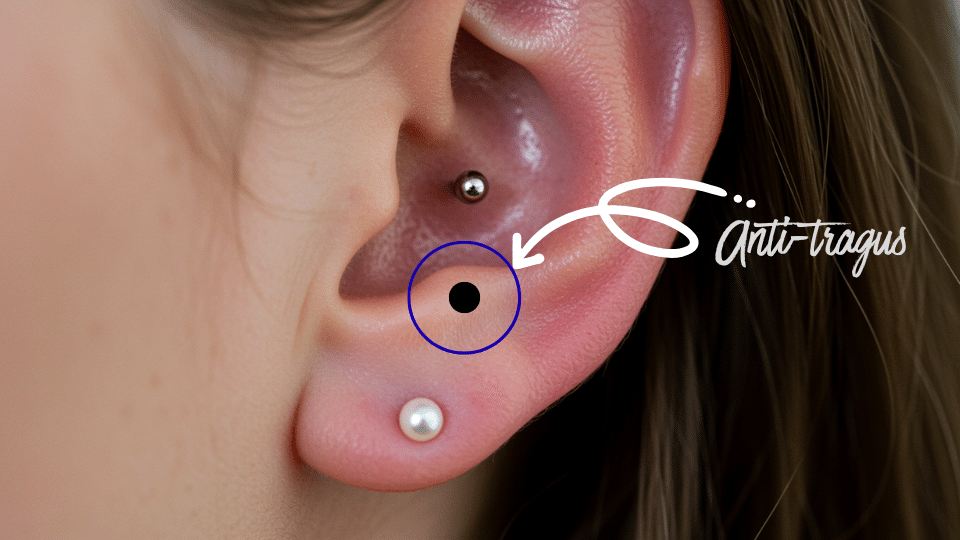
Pain Level: ■ ■ ■ □ □
Healing Time: 6 to 12 months
Best Jewellery: Small hoops or curved bars
Gen Z Style: Tiny hoops for a subtle edge
The anti-tragus sits on the ridge above the lobe. Healing can be slow because the area is firm and gets a lot of movement.
Once healed, a small hoop looks sharp without being too dramatic.
12. Orbital Piercing
Pain Level: ■ ■ ■ □ □
Healing Time: 3 to 6 months
Best Jewellery: Simple hoops
Gen Z Style: Thin hoops that link two holes
An orbital piercing connects two piercings with a single hoop. Healing is steady, although the hoop can move around, so gentle cleaning helps.
Thin hoops keep the look airy and balanced.
13. Daith Piercing
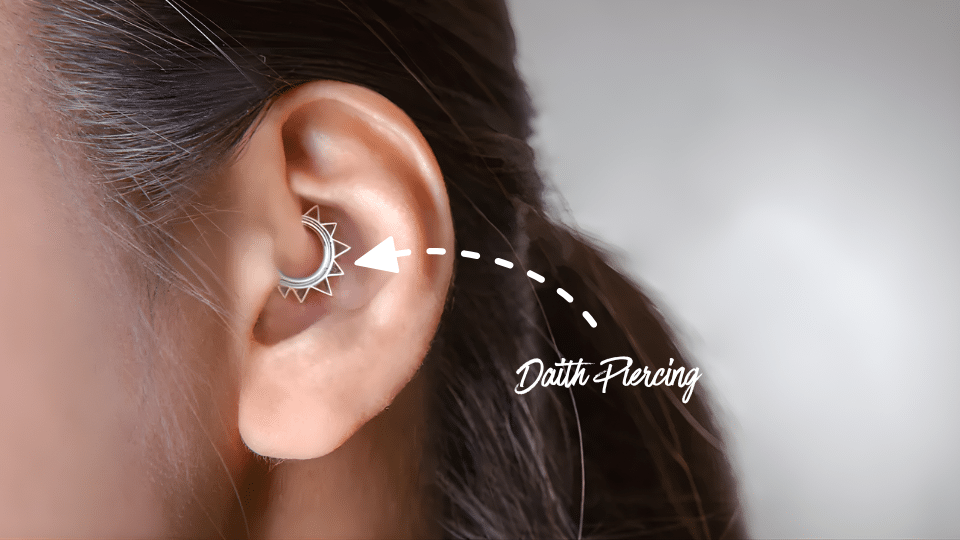
Pain Level: ■ ■ ■ ■ □
Healing Time: 4 to 8 months
Best Jewellery: Small hoops
Gen Z Style: Decorative hoops with charms or stones
The daith sits in the inner fold of the ear. Healing takes time because cleaning can be tricky. A snug hoop works best since it fits the curve naturally.
Hoops with color or tiny charms that sit close to the fold are popular.
14. Rook Piercing
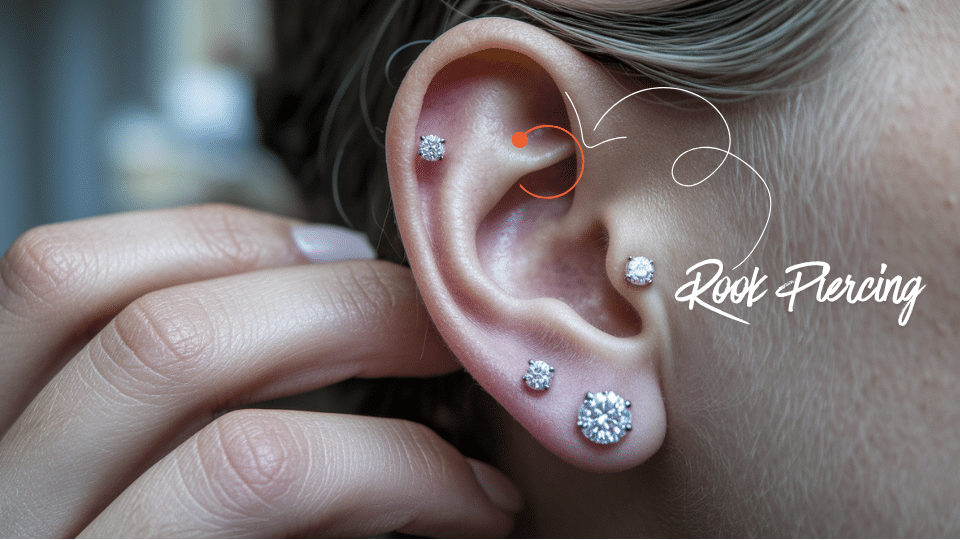
Pain Level: ■ ■ ■ ■ □
Healing Time: 6 to 12 months
Best Jewellery: Curved barbell
Gen Z Style: Small curved bars or soft metal tones
Rook piercings sit on a firm ridge that makes healing slow. Sleeping carefully helps a lot. Many people stick with a curved bar because it fits the natural shape.
Soft metal shades keep the look low profile but stylish.
15. Industrial Piercing
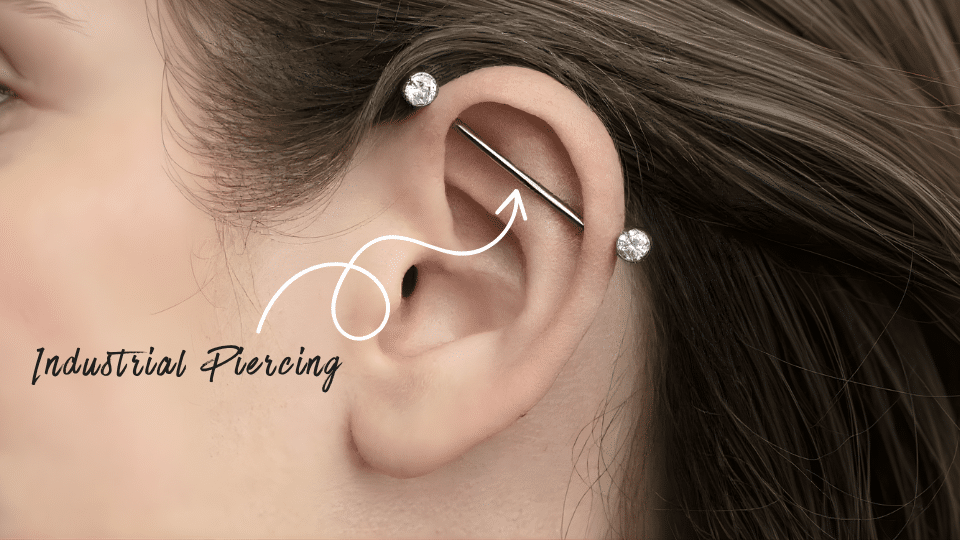
Pain Level: ■ ■ ■ ■ □
Healing Time: 6 to 12 months
Best Jewellery: Straight barbell
Gen Z Style: Simple metal bar or small charm bar
An industrial piercing connects two cartilage holes with a single bar. This needs patience because both points must heal at the same pace. Keeping hair away helps the area stay calm.
A clean metal bar or a bar with a tiny charm creates a softer touch.
16. Snug Piercing
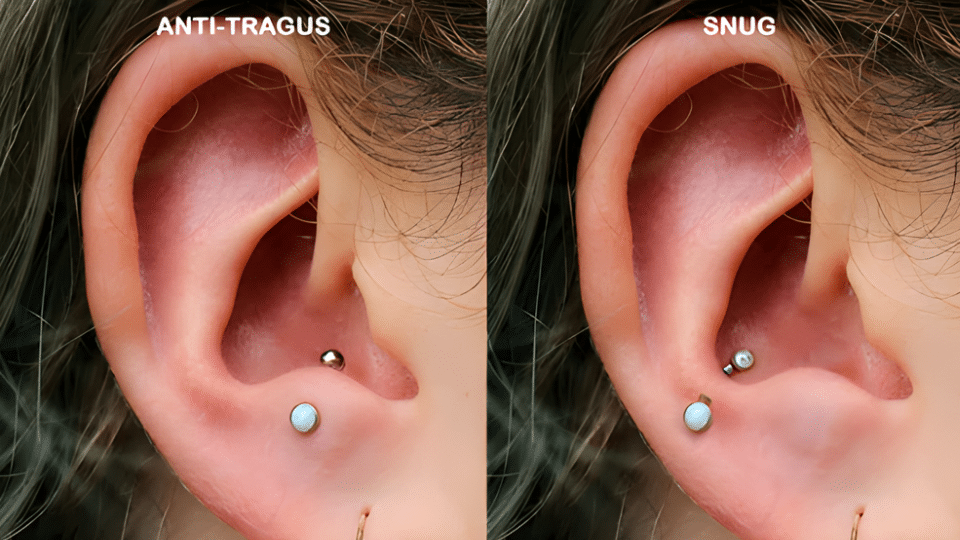
Pain Level: ■ ■ ■ ■ ■
Healing Time: 6 to 12 months
Best Jewellery: Curved bar or small stud
Gen Z Style: Simple metal tones
The snug sits deep in the inner ear. This area feels firm, so the sensation is more noticeable. Healing needs patience and gentle care.
Simple styling lets the shape of the ear stand out.
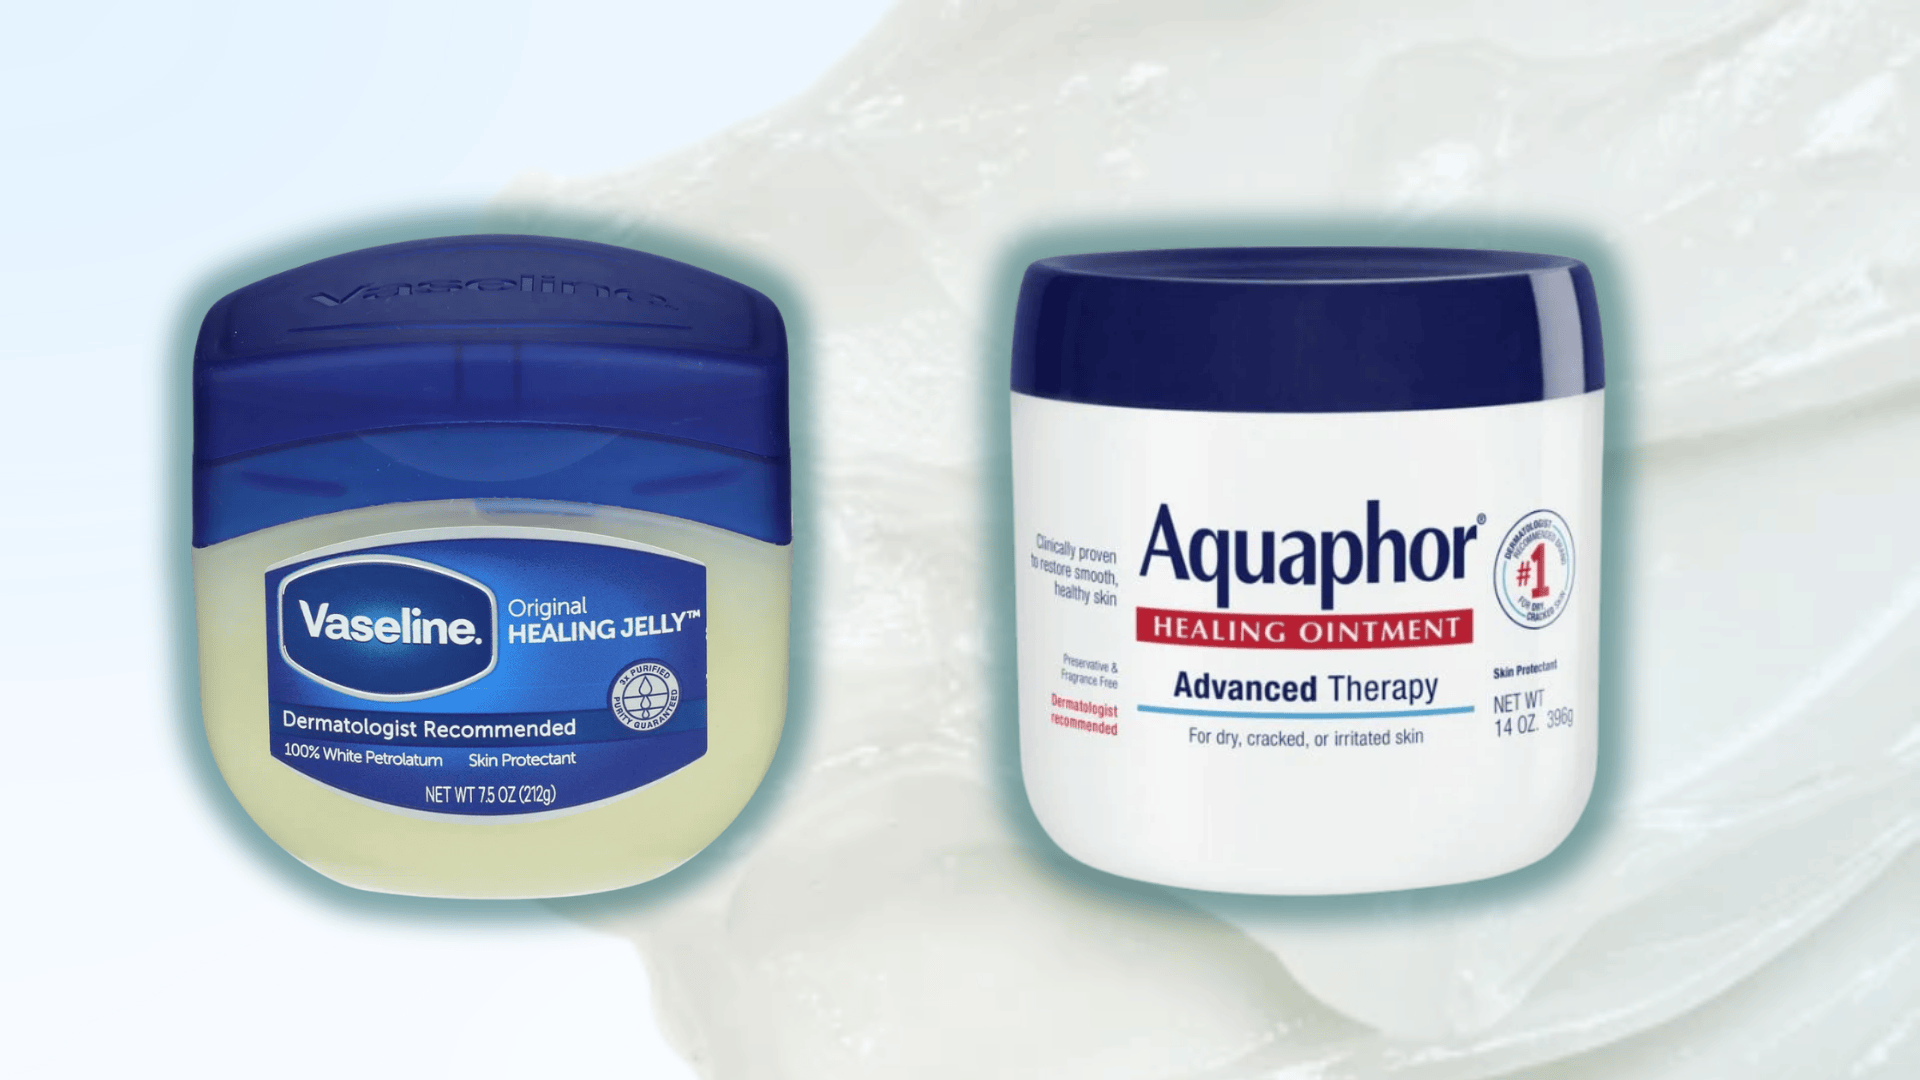
How to Get Rid of Piercing Bumps?
Piercing bumps usually come from irritation, pressure, or tight jewellery. They are common and often settle once the skin gets a calmer environment.
1. Try warm saline soaks: A simple warm salt soak once or twice a day helps the area relax and reduces swelling.
2. Avoid pressure: Hair, headphones, and tight jewellery can put pressure on the piercing. Keeping the area free from friction makes a big difference.
3. Leave the jewellery alone: Touching or twisting slows healing. Let the piercing sit quietly so the bump can shrink.
4. Switch jewellery only if needed: If the post is too short or the metal reacts with your skin, a piercer can fit a better piece.
5. See a professional if it gets worse: If the bump grows, feels painful, or develops unusual discharge, a piercer or skin specialist can help you figure out the cause.
Most bumps fade once irritation is gone. A gentle routine and a little patience usually bring the skin back to normal.
Conclusion
Choosing the right ear piercing comes down to your pain tolerance, lifestyle, and personal style.
Each type offers something different, from simple lobe piercings that heal quickly to bold cartilage placements that need more patience.
Start with what feels comfortable for you. Lobe piercings work well for beginners, while experienced piercers can explore cartilage options.
Remember that healing takes time, so follow the aftercare steps carefully.
Your ear becomes a canvas for self-expression.
Mix studs with hoops, stack multiple piercings, or keep it minimal with one statement piece. The choice is yours.
Take care of your piercings, be patient during healing, and work with a professional piercer who uses sterile equipment.
When done right, your piercings will look great and tell your unique story.
Ready to get your next piercing? Which style speaks to you most?